Showing posts with label How To. Show all posts

Saturday, January 5, 2013

How To: Cuff a Sleeve

Being tall definitely comes with many advantages, however finding clothes with long enough sleeve and pant length isn't one of them. Some manufacturers have started coming out with Tall lines for women, but they seem to think that not only are our arms and legs longer, but so are our crotches and armpits?!? Oddly enough, when I do happen to find a shirt with freak sleeves long enough for my arms it feels so weird that I just roll them up, anyway. 

So, with years of sleeve rolling practice this is my tried and true way of getting the best results from a cuff. It holds firmly and looks a little mussed up and carefree, to boot! Bonus: if your inner cuff is a different color or pattern, this cuff helps display it instead of hiding it like most typical rolling does.


  1. Start with your sleeve pulled straight down. No, that isn't a 3/4 sleeve shirt! That's just where most sleeves hit - above my wrist. 
  2. Next, flip the sleeve inside out and pull the base of the shirt cuff to just below your elbow.
  3. Finally flip the bottom edge up to about halfway across the exposed inner shirt cuff, and give it a little tszujs, VOILA!
This cuff works great under sweater as well and gives the cuff a little substance and decorative flair.


*Disclaimer, no shirts were ironed for the making of this blog post.


Thursday, November 29, 2012

How To: Ballerina Bun

This quick, easy, and chic hairstyle is pretty popular in many variations and incredibly easy to do. I use a roll I bought in a blonde color at a local beauty supply store, there are many variations all over the internet and in drug stores. Another option is to cut off the toe of a sock that is similar to your hair color and roll it into a donut. I made my bun kind of big and messy but you can easily adjust the size depending on how tight you roll it up or how big of roll you start with.

Bun Helper


  1. Start with a ponytail placed where you want the center of your bun to be, then pull your pony through the center of your donut.
  2. Next, pull the donut to the end of your ponytail and wrap the end around it.
  3. Roll the donut down the full length of your ponytail, it will naturally spread itself out.
  4. Once at the base of your pony spread your hair evenly around and adjust it to make sure everything is covered underneath.
  5. Pin it down to secure, and lightly hairspray.
  6. Voila!


Wednesday, November 14, 2012

Double-Crosser Scarf Tie

This scarf tie works great with regular-old scarves, they can be winter-weight or light-weight,  cotton or wool, because the emphasis is on the tie around the neck. It is also great for adding a little flair under coats, jackets, blazers or cardigans. Unless you have a very long scarf it might look a little off on its own as it ends up with shorts end, great for tucking under a top layer.


  1. Start with the scarf behind your neck about 3/4 of it going to one side.
  2. Next wrap the scarf around one time.
  3. Adjust the tightness around your neck.
  4. Drop your hand over and into the loop you just made.
  5. Pop your hand under the hanging side, so it is over the loop and under the tail.
  6. Grab the other hanging tail in your looped hand.
  7. Pull completely through the hole your hand was previously occupying.
  8. Give both ends a tug and tuck under your jacket, coat, blazer, etc...
  9. Ta-Da! The final product.


Wednesday, November 7, 2012

Nail How To: Cuticle Care

Once a week or so I sit down for an hour in the evening in front of the TV with my big basket full of nail polishes and goodies and give myself a manicure. I used to be an extreme nail biter - ragged nail stubs, bloody shredded cuticles, the whole nine yards of obsessive chewing. One day I decided that I just wanted to put a stop to it once and for all, and I did. The key to this cold turkey bad habit quitting was making my fingers something that I wanted to admire, not devour. Hence, the start of the weekly manicure. As long as my nails and cuticles are well groomed I am able to avoid the temptation to nibble and the side effect is fabulous nails!

The first half of my manicure is grooming my cuticles. I am not one of the lucky people who have nice smooth set back cuticles, I have the dry - would creep over half my finger nail if I let them - type. Below is my four step process diagrammed out in full detail. 

Tools:

  1. THE MOST IMPORTANT THING YOU NEED! I have tried other cuticle removers this is by far the most effective, and cheap!
  2. Cuticle Nippers
  3. Metal Cuticle Pusher I couldn't find the one I have exactly, its a few years old, hence why I like the metal, they last forever and can be cleaned and sanitized and keep a sharp edge, unlike the wooden ones.
  4. Paper Towels 

  1. Apply a generous layer of the cuticle remover onto the cuticles of one hand. Let it sit for a minute.
  2. Use the cuticle pusher to push cuticle back, it shouldn't hurt, but you will have to push hard enough to scrape them back. It may take a few tries to get this down, but you learn in time how aggressive to be. 
  3. Finger by finger, firmly wipe away the gel with a paper towel and use the nippers to cut off the excess cuticle. *Cuticles if cut to far will bleed profusely, I learned this the hard way, and still do it on occasion.
  4. Check out all of your fingers and make sure you don't have any little bits to clip.
  5. Repeat on the other hand.
Now you are ready for polish....or you are done, depending on how you like your nails!

Thursday, November 1, 2012

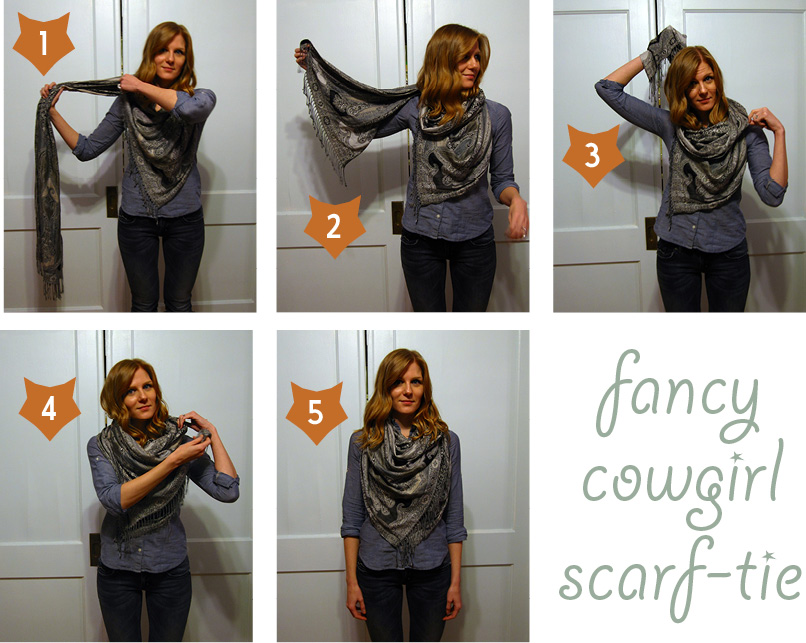
How To Tie A Scarf - Fancy Cowgirl


Start with  large rectangular scarf:

  1. First hang the scarf around the neck with approx. 2/3 hanging over your shoulder on one side, while grabbing the top corner of the other, tuck the corner under to form a triangle across your chest.
  2. Pull the longer side to allow for enough scarf to wrap around your neck.
  3. Next wrap the longer side loosely around your neck one time.
  4. Repeat the first step on the other side grabbing a corner and tucking it under the wrapped portion around your neck to form an overlapping triangle.
  5. Ta-Da! You can use safety pins or a brooch to hold this wrap in place or just re-tuck the corners throughout the day, depending on the texture of your scarf you may not need the pins.

This wrap looks great layered under coats or just on its own, it is generally my go-to wrap if the scarf is going to be a day long accessory and not just for cold weather layering. This tie works well with large scarves and many different weights.