Showing posts with label Basics. Show all posts

Saturday, January 5, 2013

How To: Cuff a Sleeve

Being tall definitely comes with many advantages, however finding clothes with long enough sleeve and pant length isn't one of them. Some manufacturers have started coming out with Tall lines for women, but they seem to think that not only are our arms and legs longer, but so are our crotches and armpits?!? Oddly enough, when I do happen to find a shirt with freak sleeves long enough for my arms it feels so weird that I just roll them up, anyway. 

So, with years of sleeve rolling practice this is my tried and true way of getting the best results from a cuff. It holds firmly and looks a little mussed up and carefree, to boot! Bonus: if your inner cuff is a different color or pattern, this cuff helps display it instead of hiding it like most typical rolling does.


  1. Start with your sleeve pulled straight down. No, that isn't a 3/4 sleeve shirt! That's just where most sleeves hit - above my wrist. 
  2. Next, flip the sleeve inside out and pull the base of the shirt cuff to just below your elbow.
  3. Finally flip the bottom edge up to about halfway across the exposed inner shirt cuff, and give it a little tszujs, VOILA!
This cuff works great under sweater as well and gives the cuff a little substance and decorative flair.


*Disclaimer, no shirts were ironed for the making of this blog post.


Sunday, December 23, 2012

Easy Chic: Comfy Dresses

With all of the holiday eating that is going on between meats & cheeses, cookies, and fancy cocktails we could all use some comfortable attire. That doesn't mean you can't look good while stuffing your face, visiting family, and driving to the country. While it is easy to slip on your favorite jeans and a nice top and necklace, it is just as easy to pull over a cute dress, throw on a cardigan, and slide into your favorite boots. Not only will you be cozy, everyone will be impressed that you are dressed a step above. The most important part of this wardrobe staple is its versatility, its comfort, and its lack of care needed (no ironing!!!!). Here are a few to get you started, mix them up by layering necklaces, scarves and cardigans. Tights are highly recommended with your favorite flats and boots.


  1. Monochrome Shift
  2. It's a Sweatshirt Dress!
  3. Incredibly Versatile
  4. Preppy Classic
  5. Feminine and Flirty
  6. Cool Color-block (also in all black)


Thursday, December 6, 2012

Be Bold AND Beautiful

So you have all seen them, especially if you happen upon a JCrew catalog, but I am willing to bet many of you don't utilize their beauty power! Your Mom knew their power, your Grandma probably even more so, what you ask is this super beauty powerhouse??? BOLD lips! Nothing can spruce up your face or your outfit like a bright beautiful lip. Whether you go for classic red or current hotties, hot pink and red-orange you will instantly appear to be a chic stylish lady with minimal effort. A little trip to Sephora or your favorite make-up test zone with your BFF is a great way to find the best color for you. There are also a lot of make-up specific bloggers out there that will recommend a number of super fancy ( NARS-$$$) lipsticks, which I am sure are incredible, but if you don't have tons of money to spend on a test drive your local Target store has more than enough offerings to get you going. However, it is very important that with you purchase of lipstick you also purchase a lip liner, this is essential to a long lasting non-feathering successful bold lip. You can go one of two routes, either purchase a lip liner that closely matches your lipstick color, or purchase a clear lip liner that will keep your edges clean with multiple shades.

   Hot Pink                          Classic Red                        Orange-y Red


Steps to get long lasting bold lip color:
  1. Carefully line lips on the very edge with a nice clean smooth outline.
  2. Fill lips with liner - if using a same color liner
  3. Apply a coat of lipstick
  4. Blot lips
  5. Dust a layer of your face powder over your lips
  6. Apply a second coat of lipstick
  7. Blot


Voila! Be prepared for a few head turns...

Holiday parties are a great time to bust these out for a great WOW factor, but don't hesitate to mix it into your everyday make-up and give those smokey eyes a break or give your  glasses a geek chic upgrade!

Thursday, November 29, 2012

How To: Ballerina Bun

This quick, easy, and chic hairstyle is pretty popular in many variations and incredibly easy to do. I use a roll I bought in a blonde color at a local beauty supply store, there are many variations all over the internet and in drug stores. Another option is to cut off the toe of a sock that is similar to your hair color and roll it into a donut. I made my bun kind of big and messy but you can easily adjust the size depending on how tight you roll it up or how big of roll you start with.

Bun Helper


  1. Start with a ponytail placed where you want the center of your bun to be, then pull your pony through the center of your donut.
  2. Next, pull the donut to the end of your ponytail and wrap the end around it.
  3. Roll the donut down the full length of your ponytail, it will naturally spread itself out.
  4. Once at the base of your pony spread your hair evenly around and adjust it to make sure everything is covered underneath.
  5. Pin it down to secure, and lightly hairspray.
  6. Voila!


Wednesday, November 7, 2012

Nail How To: Cuticle Care

Once a week or so I sit down for an hour in the evening in front of the TV with my big basket full of nail polishes and goodies and give myself a manicure. I used to be an extreme nail biter - ragged nail stubs, bloody shredded cuticles, the whole nine yards of obsessive chewing. One day I decided that I just wanted to put a stop to it once and for all, and I did. The key to this cold turkey bad habit quitting was making my fingers something that I wanted to admire, not devour. Hence, the start of the weekly manicure. As long as my nails and cuticles are well groomed I am able to avoid the temptation to nibble and the side effect is fabulous nails!

The first half of my manicure is grooming my cuticles. I am not one of the lucky people who have nice smooth set back cuticles, I have the dry - would creep over half my finger nail if I let them - type. Below is my four step process diagrammed out in full detail. 

Tools:

  1. THE MOST IMPORTANT THING YOU NEED! I have tried other cuticle removers this is by far the most effective, and cheap!
  2. Cuticle Nippers
  3. Metal Cuticle Pusher I couldn't find the one I have exactly, its a few years old, hence why I like the metal, they last forever and can be cleaned and sanitized and keep a sharp edge, unlike the wooden ones.
  4. Paper Towels 

  1. Apply a generous layer of the cuticle remover onto the cuticles of one hand. Let it sit for a minute.
  2. Use the cuticle pusher to push cuticle back, it shouldn't hurt, but you will have to push hard enough to scrape them back. It may take a few tries to get this down, but you learn in time how aggressive to be. 
  3. Finger by finger, firmly wipe away the gel with a paper towel and use the nippers to cut off the excess cuticle. *Cuticles if cut to far will bleed profusely, I learned this the hard way, and still do it on occasion.
  4. Check out all of your fingers and make sure you don't have any little bits to clip.
  5. Repeat on the other hand.
Now you are ready for polish....or you are done, depending on how you like your nails!

Monday, November 5, 2012

Great Coats Under $300


A great coat is a winter necessity. Since it is the piece you will wear almost every day and is the first thing people will see when you meet them during the cold season, it makes a big impression. You are also dependent on it to keep you warm while looking great. When I buy a coat, I expect it to last at least three winters - if not more. A few years ago, with the help of a coupon, I invested in the Thinsulate lined tall version of the classic wool J.Crew coat; it has not let me down in terms of warmth or appearance. I expect to have it at least three more years. I found these coats that I think will keep you warm and chic well into next winter: 

My Coat (but mine is petrol blue from a few years ago) - This is under $300 if you use a coupon which J.Crew offers for signing up for email, or just every few weeks on their site.
  1. Great Color and Collar
  2. Pretty Puffer
  3. Fantastic Faux Fur
  4. Perfect in Persimmon
  5. Cute Color Blocks
  6. Thats A Wrap

Thursday, November 1, 2012

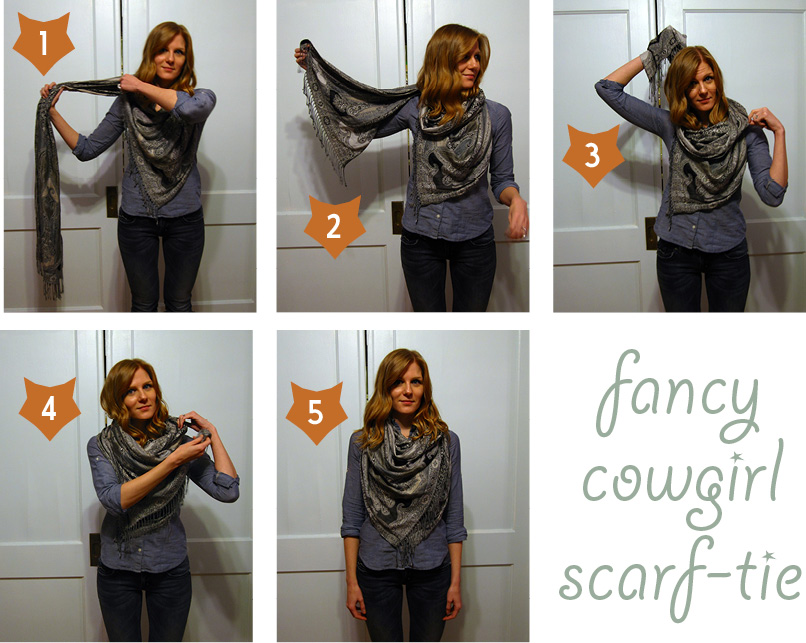
How To Tie A Scarf - Fancy Cowgirl


Start with  large rectangular scarf:

  1. First hang the scarf around the neck with approx. 2/3 hanging over your shoulder on one side, while grabbing the top corner of the other, tuck the corner under to form a triangle across your chest.
  2. Pull the longer side to allow for enough scarf to wrap around your neck.
  3. Next wrap the longer side loosely around your neck one time.
  4. Repeat the first step on the other side grabbing a corner and tucking it under the wrapped portion around your neck to form an overlapping triangle.
  5. Ta-Da! You can use safety pins or a brooch to hold this wrap in place or just re-tuck the corners throughout the day, depending on the texture of your scarf you may not need the pins.

This wrap looks great layered under coats or just on its own, it is generally my go-to wrap if the scarf is going to be a day long accessory and not just for cold weather layering. This tie works well with large scarves and many different weights.

Wednesday, October 31, 2012

Birthday Foxes

Fox Blouse Detail
Today is my birthday and I share it with my twin sister. We are full-on identical twins, which is awesome; we both feel bad for people that don't have twins because we can't imagine life without each other. Happy Birthday, Terrie, I love you and think you are the best! This year I have received some fox-themed birthday gifts and wishes, but my absolute favorite came from my absolute favorite twin sister. It is a pretty sweet fox blouse that I've had my eye on. I had my husband take a few pictures for me to share because my look today showcases the majority of my blog posts so far in action while highlighting my foxy gift.

Fall Essentials in Action: Boots and Blazer

Hair Tip: Day 2 of Waves and Dry Shampoo

In case you want a fox blouse of your own:
Super Cute Fox Blouse!

I also woke up to this little guy on a handmade card from my husband:

Sunday, October 28, 2012

Making Waves - A Hair Curling How To


I have had a few requests for how I make my super straight hair wavy, so here is a picture step-by-step. 

Supplies:
1 in. Curling Iron
The Best Hair Spray Ever!
Clips

  1. Start with completely dry hair, this is my fresh out of the shower two minute blow dry, no need for fancy brush tricks.
  2. I grab the very first front piece of my hair and start wrapping the top of my hair around the top of the barrel away from my face. Notice I don't close the clamp, and yes you just stand there holding the end and count to thirty or so.
  3. See the nice curl? It should look like that once you release.
  4. Now I pull back the top layer and secure with a clip. (Sometimes I skip this and just grab chunks, it's up to you and your skill level)
  5. Make your way all around the bottom layer with approx. 1 inch chunks until you get to the back of your head. Always wrap your hair in the direction away from your face.
  6. Release the clip and do the same with the top layer, it will be easy to sort the straight chunks out from the curled chunks underneath.
  7. Get as far around the back as possible so hopefully you will meet both sides in the back.
  8. Start the same process on the other side of your head and repeat all the same steps.
  9. There is always a sneaky hiding piece in the back!
  10. Make sure to point the curling iron down in the back your arm might get a little tired but don't drop is sideways or the curls look odd.
  11. Smile at your patient and silly husband and let you know appreciate his help.
  12. Once all the pieces have been curled, separate them by gently pulling them apart.
  13. Tszuj!!!
  14. A little bit of hairspray to keep things in place.
  15. Immediate results, mine tends to settle after an hour or so, to not be as precise and a little more be beachy.

FOXY!

I combine this look with my dry shampoo regimen and get at least two days, if not three, of wavy hair wear. The second day looks much more relaxed and tousled, which I actually prefer.

Friday, October 26, 2012

Fall Fundamentals


Every girl knows each season holds it’s own special influence on our dressing, we build our looks from a steady stable of fundamental pieces. At least one of my fall fundamentals appear in 9 out of 10 of my outfits, some times I may be layered up and every one!


A year round staple that needs to be included is a great pair of sunglasses!